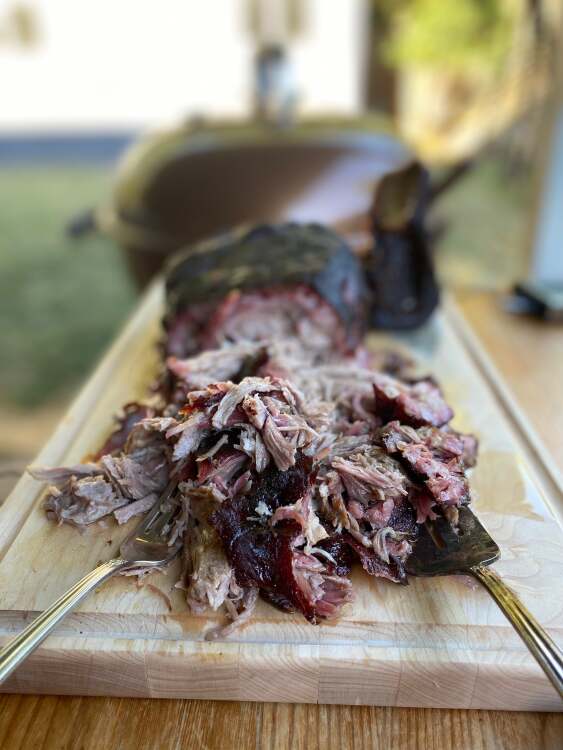
How to Smoke Your First Pork Shoulder on a Charcoal Grill
Until very recently, I avoided the world of barbecue. Getting up early? Being outside? Asking men for advice? None of this sounded all that appealing, but here I am, showing you pictures of some pulled pork I smoked for my family, and I fully “get it.” Getting up early mean you get a little bit of peace and quiet, and smoking gives you an activity that needs your attention—you can fiddle and futz with it throughout the day without being too stressed out. I get why dads love smoking meats, is what I’m saying.
There are a lot of fancy smokers out there, but we’re going to be focusing on a simple charcoal setup using a Weber Kettle (or similar grill) equipped with an external digital thermometer. Other than that, you’ll need some briquettes, some wood chips, a drip pan, and a bone-in pork shoulder (also called a “butt”).
My first piece of advice? Don’t be intimidated. Though smoking can seem kind of complicated at first, smoking a pork shoulder is one of the easier large-format meat projects you can take on, even on a simple charcoal grill. It’s a forgiving cut that’s hard to dry out, thanks to a large amount of intramuscular fat. I’m sure you could dry it out if you completely ignored the next 2ooo or so words, but you’re not going to do that. You’re going to do just fine.
Buy a dual-probed thermometer
Sorry, but there is no way around it. You must buy an external temperature-taking device, and it should have at least two probes—one for taking the temp of the meat, and one for taking the temp of the air inside your grill. As I have mentioned several times, the little thermometer that sits on the dome of your grill is wildly inaccurate, and it’s impossible to control the temperature if you don’t know the temperature. There are many fancy-boy thermometers with bluetooth capabilities and such, but a $30 model will work just fine. (I have an older model of this one.)
Start small(ish) and give yourself plenty of time
Pork shoulders can get kind of big. The bigger the shoulder, the longer it will take to smoke and reach the end point. This seems obvious, but trust me when I say that you’ll be tempted by larger shoulders at the grocery store. All of the shoulders I’ve smoked were nearly eight pounds, and all took at least 11 hours, and burned through a lot of charcoal. (I had to add a little extra at the end of my first one, and it was a pain in my butt!) Each shoulder is different in terms of fat and moisture content, but you’ll want to allow 1-1 1/2 hours of cook time for each pound.
Five is an excellent size for a beginner. You’ll get plenty of meat off the thing, and you’ll have to get up early, but not so early that it’s unbearable. To calculate how early you should get up, multiply the poundage by 1.5, then add an hour and count back from your meal time, keeping in mind that dinner still might be a little late. Pork will not be rushed, but it is worth the wait.
Trim some fat
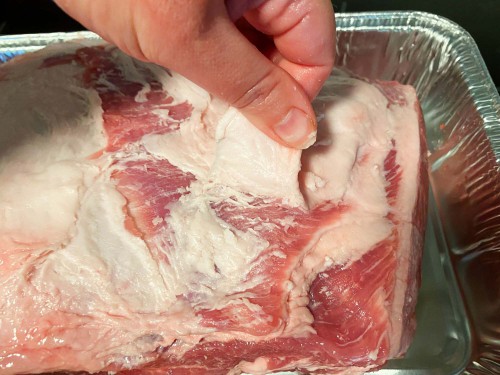
The intramuscular fat that lives within the muscle will melt and moisten your pork, but that big fat cap on the end isn’t all that helpful. Not only does it hang out on the outside, never making its way into flesh, it has the audacity to sit there and prevent both your salt and your rub from permeating and flavoring the meat, and the meat is what you’re going to be eating. To get rid of it, slide a thin, sharp knife under a thick corner of fat to create little “fat tab,” then pull on that tab as you slice fat away, so you can see the pink flesh. (Don’t get obsessive; a little bit is fine.)
Salt before you rub
Salt is a small molecule, and it permeates the meat with ease. Most of the flavor molecules in a rub, however, are much larger, and they cannot penetrate deep into the meat. (According to AmazingRibs.com, most rub ingredients only make it around an 1/8th of an inch below the surface.) That’s fine. In fact, that’s exactly what you want a rub to do—sit on the surface and create a beautiful bark of complementary flavors, but it does mean you should treat salting and rubbing as two different flavoring steps. Add salt 12-24 hours beforehand to give it time to draw out moisture, dissolve, and make its way into the muscle; then apply your (salt-free) rub right before you start smoking.
If you are using a salt with a small crystal structure—and I’ve been using Morton Natural Sea Salt, which is the size of table salt but iodine-free—you’ll want to aim for at least 1/4 teaspoon per pound, though I usually end up sprinkling out a little less than 1/2 a teaspoon per pound. (I used a full 3 teaspoons on my most recent 7 3/4-pound pork shoulder, and it was perfect.) If you’re using something with a larger crystal, you can use a larger volume of salt—Meathead Goldwyn uses a ratio of 1/2 teaspoon of Morton coarse kosher salt per pound, and it seems to serve him well.
Snake your charcoal
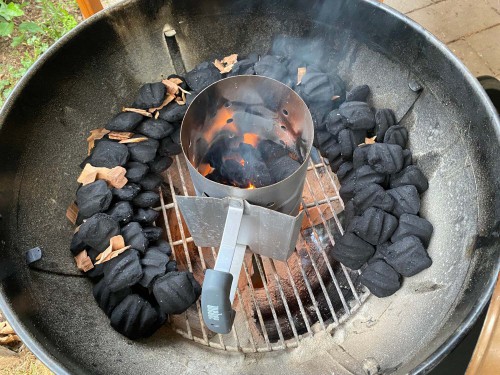
“The Snake” is a charcoal stacking method where you literally snake your briquettes around the outside of your grill, then light one end and let the coals slowly burn throughout the day. (Yes, you could “just get a Slow ‘n’ Sear,” but I think knowing how to do this without that particular attachment is valuable knowledge.) There are a few variations on this theme, but I found that a rough 24 briquette-long snake of coals, stacked two high and two wide, with some single coals along the top of the snake, was just—and I mean just—enough to fully cook my nearly eight-pound pork shoulder. I will probably add a little more next time—there were no unburnt coals remaining when I opened my grill, and that last bit of cooking was done with the pure residual heat.
In addition to charcoal, you’ll also need some wood chips. I used applewood, and placed 3-4 smallish chips in between the coals on top of the snake, with the majority of the wood at the beginning of the snake, and more space between wood piles towards the end.
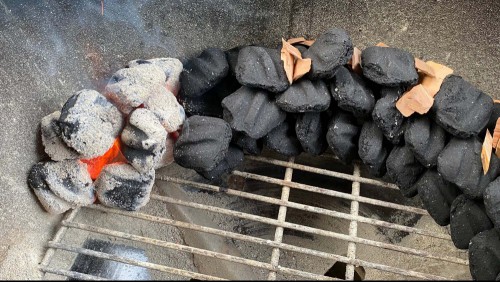
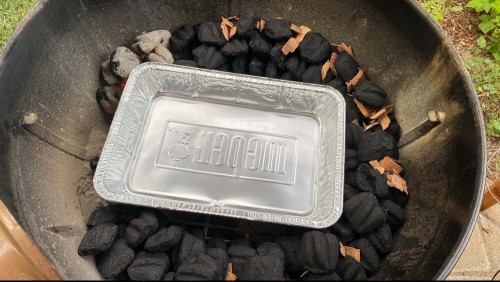
Once your snake is all settled, fill your chimney about 1/3 of the way full with charcoal, and get those babies going with a lighter cube or some newspaper. (If you need a refresh or primer on the chimney, give this a peep.) Once the coals are mostly ashed over, dump them at the beginning of the snake (the side with more wood chips), then set a drip pan in the center of your snake, and fill it about halfway with boiling water.
Set the grill grate over the snake, apply your rub to your meat, and set the pork shoulder over the drip pan in the center of the grill. Stick one thermometer probe in the thickest part of pork that’s at least an inch away from the bone, and another on near—but not touching—the shoulder (your thermometer should come with a little probe clip that keeps it off of the grates). Close it up, with the exhaust vent opposite from the hottest coals, and start smoking.

Control the air
As you probably know, there are no temperature control dials on a charcoal grill, which is one of the first things you have to get used to when grilling with charcoal. A lot of people have a lot of opinions on exactly where you should set your intake and exhaust dampeners, but it doesn’t really matter, as long as you find a setup that keeps your internal grill temperature between 225℉ and 250℉.
I like to start with the intake dampener (the one on the bottom) completely open, with the exhaust dampener (on the top of the lid), about halfway open, then close it to just a sliver once the ambient temperature inside the grill breaks 200℉.

You’ll probably have to fiddle a little more than that, but try not to fiddle too much, and wait 30 minutes in between adjustments. About halfway through the cook, you may be tempted to open the grill and take a peek to see “how things are going.” Don’t do this! You’ll release a bunch of heat and moisture. Remember: If you’re looking, you’re not cooking.
Clean as you go (the ash trap, that is)
Your charcoal will turn to ash as it burns, and that ash will accumulate, blocking the flow of air and suffocating your coals. This will result in a drop in temperature, which you do not want.
Luckily, the solution is simple. A few quick back-and-forth swipes of the little cleaning blades—the same ones that control the air flow through the bottom vents—is all it takes to clear out the ash and get you back on track. (Just remember where you had them set so you can put them back where they were after cleaning.)
About the stall
If you’ve read anything about smoking meats, you have heard of “the stall.” The meat hits a temp of around 150℉, and refuses to climb anymore for hours. According to AmazingRibs.com, the culprit is water, and there are a few tactics you can take to combat the stall:
That’s [the stall] because the moisture evaporating from the surface is cooling the meat at the same rate as the hot air is warming it, and the internal temperature stalls. You can just ride it out, or you can bust through the stall by cranking the heat to about 300°F or by wrapping the meat tightly in foil.
I don’t know why, but I have never encountered a major stall. I certainly saw a slow, but my pork never got stuck at one temp for more than an hour and a half. If you encounter such a dreadful pause, I recommend just waiting it out or, if you’re in a time crunch, opening up the vents and letting the heat rise to the aforementioned 300℉. I would not recommend wrapping your shoulder in foil, as that can fuck up your beautiful bark, and the stall actually helps create that bark.
Let’s cook the thing.
Now that you’ve read all that, it is time to cook. To smoke your very first pulled pork on a charcoal grill, you will need:
A bone-in pork shoulder in the 5-6 pound range
Salt, 1/4-1/2 teaspoon per pound, depending on the crystal size (Use a larger volume of salt if the crystals are large.)
Salt-free rub of your choice. (I have been using Rocky’s Rub because the people at SnS sent it to me for free, but any nearly all of these will work if you omit the salt.)
The day before you plan to smoke your shoulder, take it out of the fridge and trim the fat as described above. Salt the pork on all sides, set in pan, and return to the fridge for 12-24 hours.
Remove the pork from the fridge and start setting up your grill. Arrange your charcoal in the snake formation as shown above. Your snake should be at least 24 briquettes-long, stacked two high and two wide, with some single coals along the top of the snake. Add your wood chips, a few every couple of briquettes, with most of them towards the beginning of the snake, and fewer on the latter half. Fill your chimney about 1/3 of the way full with charcoal, and light a lighter cube or some newspaper underneath the coals. Once the coals are mostly ashed over, dump them at the beginning of the snake (the side with more wood chips), set a drip pan in the center of your snake, and fill it about halfway with boiling water.
Set the grill grate over the snake, apply your rub to your meat, and set the pork shoulder over the drip pan in the center of the grill. Stick one thermometer probe in the thickest part of pork that’s at least an inch away from the bone, and another one near—but not touching—the shoulder. Close it up with the exhaust vent opposite from the hottest coals, open the intake dampener fully, and the exhaust dampener halfway.
Once your grill temperature reaches around 200℉, adjust your exhaust dampeners so they’re opened just a sliver. Let the temp stabilize, and adjust more if needed. If you need your temperature to rise, open the top vents a little more; if you need it to fall, close the bottom vents a bit (as you probably cannot close the top anymore with closing them completely). Keep an eye on the temp and make small adjustments as needed to keep things between 225℉ and 25o℉.
Smoke until your pork reaches an internal temperature of at least 194℉, rotating the lid every once in a while to keep the exhaust vent on the opposite side from the burning coals. (You won’t be able to see exactly where the coals are burning, so just move it a couple of inches every hour and a half or so.) Temp-wise, I know some people like to go higher, but none of my shoulders have ever broken 200℉, and all have been incredibly tender, juicy, and delicious. As long as that bone feels loose, you’re good.
Once your pork is done, remove it from the grill with a big spatula or meat claws and get it on a cutting board or in a pan. It will look burnt, but it is not. It is smoked, and that black exterior is your delicious bark. Remove the bone, and shred the meat with two forks (or BBQ claws). I like to shred the meat as I go, rather than shred it all at once, but either way is fine. Serve with buns, coleslaw, your favorite BBQ sauce, and maybe some pickles, and be prepared to receive many compliments. You did it, and I am so very proud of you.
Claire is Lifehacker's Senior Food Editor. She has a B.S. in chemistry, a decade of food journalism experience, and a deep love for mayonnaise and MSG.
RECOMMENDED NEWS
How to Roast a Whole Chicken Without Messing It Up
There is something quite homey and family-oriented about the site of a whole roasted chicken. It mak...

Three Ways to Make Pigs in a Blanket, Already Perfect, Even Better
My most looked-forward-to appetizer at any casual party is pigs in a blanket. I expect to see them a...

A can of cooking spray and a stovetop with a pan of veggies cooking
If you’ve ever found yourself reaching for a can of cooking spray before scrambling your morning egg...
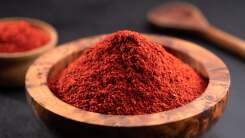
The Different Kinds of Paprika and How to Use Them
Depending on when you were born and how much TV your parents let you watch, your first introduction ...

The Easy Way to Freeze (and Thaw) Leftover Turkey
Some foods keep fine in the fridge for longer than others, and whether you observe the rules of the ...
These Mini Baked Potatoes Are Party Potatoes
Sliders, cupcakes, petite quiche, and pigs ‘n blankets have something in common: They were all mad i...
Comments on "How to Smoke Your First Pork Shoulder on a Charcoal Grill" :