7 Perfect Pickles You Must Keep on Hand at All Times
I learned that I had ADHD late in life. It became funny when I went from hesitatingly revealing it to close friends to realizing literally every single woman I know (and most of the rest of the people I know, too) all have ADHD.
Pickles also, if you’ll allow me, have ADHD.
They’re aspirational and complicated, resilient and resourceful, but occasionally affected by external sources in rough ways. They are constantly trying to be something different and better, making use of what is around them in interesting ways. (Or they’re just delicately rotting food that we put on burgers.)
Either way, I’m glad the last decade of food writing has emphasized the importance of balancing our foods with acid. Here are the pickles I think deserve the most credit in that regard.
(A note: Almost every culture has a method of preserving that has resulted in an awe-inducing array of pickles across every cuisine imaginable, and I am here for every damn one. These are just my most often used, but I am eager to hear about yours.)
I don’t care who you are, where you’re from, what you did, as long as you have pickled red onions on your shelf.
There is no sandwich unimproved by pickled red onions. Burgers, tomato sammies, the roast beef sandwich I’ve been living on for the last week, etc.—all are elevated with the humble yet effective pickled red onion. This isn’t a matter of swapping regular onions for pickled onions, although you should—they have a wholly different, sweeter flavor profile.
To make them, thinly slice red onions, throw them into a jar and pour brine on top. The brine is made of 1 cup water, 1 cup vinegar, and 1 tablespoon of canning salt. Scale up as needed. Boil the brine, wait for it to cool for 10 minutes and pour it over your onions. I leave them out to ferment for at least a week, and then throw them in the fridge to continue mellowing over time. You can add all kinds of seasonings—from mustard seed to dill—but I don’t add anything to my onions. They are perfect in their simplicity.
While pickled onions are often credited to the British, it’s clear that they must have originated in the East, with ample evidence of earlier use in Indian and Asian. Much like the artifacts in the U.K.’s most famous museums, it seems pickled onions “became British” by way of colonialism.
Here’s the sweet thing about umeboshi: The umeshu—a byproduct of fermenting unripe ume plums and shiso leaves—has a wide variety of uses. It’s a salty, funky vinegar that is purple in hue, and can be added in all kinds of places you’d never think.
Whipped cream, for one, and obviously any dressing, but you can use umeshu to quick-pickle other vegetables, as well. Throw some carrots into a jar with umeshu for a week or so. Mushrooms, marinated in umeshu and some sesame oil are spectacular. My favorite use to date is adding it to bubbly water as a drinking vinegar. (Someone better at alcoholing would know how to cocktail off of it.)
You can make umeboshi yourself. It’s a slightly involved process that requires remembering that “ume” and “May” rhyme, then finding someplace in late Spring that will get you ume plums. (Uwajimaya is a good source.) But, I’m quite thrilled to say, I’ve had success using Italian plums, too, at least insofar as obtaining umeshu. Plenty of places sell umeboshi, all ready to go, and some places even sell the vinegar itself.
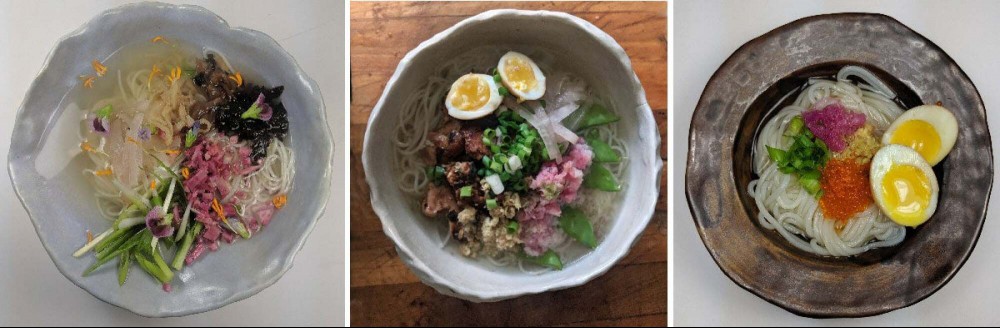
Every summer, I obsessively consume umeboshi along with a slew of other pickles in a bowl over cold soba noodles in dashi, with a soft egg. (I haven’t made plum sauce with umeboshi yet, but only because I just thought of it.)
If you’re determined to DIY, take blemish-free ume plums, wash them in alcohol (vodka will work), and layer them in a glass container with shiso leaves and pink salt. Create a (virtually) oxygen-free environment by sealing the jar with a bag of water, and add a weight at the end, and not one of those pansy weights we usually use to keep things submerged—you need actual weight to compress the plums and salt. (Here is an in-depth tutorial from someone far more qualified than I am.)
In addition to these perfect plums, Japanese cuisine includes a wide array of pickles across multiple methods, including brining, and fermentation in rice, miso, koji, and dashi. You can buy some of these these pickles at your local Asian grocer, but dive in deep and try making some of them yourself. It’s deeply rewarding.
Some people swear by Heinz ketchup, that no homemade version can compete with perfection. And, even though I enjoy having the ability to make pickles from what I grow, I’ll defend a good Clausen or McClure’s or Bubbies any day. Regardless, you want to keep a good, classic dill pickle around, and there’s no reason not to because, pickles can legitimately stick around forever in your fridge.
Not convinced by shelf-life alone? I’ll give you an additional three (3) good reasons to keep these powerful sours in your kitchen: The first is the most obvious. A burger of almost any kind of is legitimately improved by the addition of an acidic pickle. It cuts through the deep richness of the meat and marries the flavors of the ketchup, mayo, meat, and cheese together into one perfectly balanced bite.
The transformative quality of pickles is reason two. A sliced pickle is just one format—a pickle can quickly become a relish for a dog, or if sliced, a cornichon stand-in on a cheese tray.
Reason three is the brine. Pickles come in brine, which has a million uses—yes, you can drink it as a pickleback, but I add it to gazpacho and occasionally pasta sauce. It’s a perfect punch. Bloody mary? Definite 12/10. Potato salad? Absolutely. In fact, it makes a smart dressing.
And while a dill pickle feels uniquely American (probably because I’m American), like almost all things ‘Murica, it came here from someplace else. From The History of Pickles:
Pickles have been around for thousands of years, dating as far back as 2030 BC when cucumbers from their native
India
were pickled in the Tigris Valley.
So. Not American then.
I didn’t grow up around kraut, so I was never really sure what to do with it. Like a Kosher dill, this is not where you should go commercial unless you live near a proper deli. Sadly, I do not.
Luckily, kraut is the perfect fermenting project for beginners.
You start with cabbage—red cabbage or green, doesn’t matter. Shred it, and massage in 3% of the mass of the cabbage in salt. Really get in there with your hands and rub the salt into the veg. As you do, the cabbage will expel water. After an hour, take that cabbage and stuff it into a jar, and punch it down to really pack it in. Pour the expelled liquid over it. The liquid will cover the cabbage, which is important. The cabbage must stay submerged under the liquid, and using a weight helps. I myself enjoy these pickling lids and springs from Ball.
Give it a few days (at room temperature), and you’ll see the kraut start to bubble, which means you have fermentation happening. Give it a taste daily. When it gets to the level of funk you enjoy, put it in the fridge. It won’t stop the fermentation, but it slows it considerably. I love to do layers of green and red cabbage for my kraut, which will all mellow out to a delightful pink.
While kraut is most often associated with German culture, it’s yet another example of Asian influence. From The Kitchen Project:
Over 2000 years ago the Chinese were building the great wall of China and needed to feed thousands of workers in a remote area. They found probably one of the most remarkable things about cabbage is that you can preserve it with no refrigeration or canning by fermenting it. They didn’t use salt, probably because salt was scarce back then, but they used a rice wine to ferment and preserve the cabbage and it was a nutritious dish that fed the workers and kept them healthy and strong.
So again, not a white innovation!
Now, I enjoy a pickled jalapeño, and a pepperoncini right out of the jar is my secret shame food. Please: Buy and enjoy. I’m not talking about those. I’m talking about making lacto-fermented peppers and impressing everyone you know while bathing in a tub of your own salsa. Trust me.
Pick a selection of peppers that fits your spice profile. I start with a selection of larger mild peppers and chuck in a few spicier options. Peel the labels off and char them. In the summer, I use a grill; in the winter, I use my broiler. Once one side is blistered, flip them over and do it again.
Remove the peppers and let them cool. Pull out the stem and seeds (they come out easily). I don’t really peel these peppers, I like the char.
Pack the peppers into a glass jar, and add a 3% brine. (Here’s a charming brine calculator to help.) Add an air lock to the top and wait a week or two. You’re looking for fermentation, so bubbles are good. White mold is OK (that’s kahm yeast, strain it off and try again), but any other kind of mold is not OK, so chuck it if you see it.
Now, you could blend these peppers with vinegar and have a completely delightful homemade pepper sauce. I say, level up.
Chop the peppers and add them to a glass, ceramic, or food-safe plastic container. Now add diced garlic, chopped tomatoes, chopped scallions, tons of cilantro, a healthy amount of lemon and lime juice (at least 2 tablespoons per quart of salsa), and the liquid from the peppers. Season with salt to taste. Cover and let it sit at least overnight, but I prefer waiting two or three days. The result is the most delicious fermented salsa you’ve ever had. You can process it, though it loses a little bit of its magic (and obviously, the live fermentation), but it’s a great use of a pickle.
Pickled peppers appear to have originated in the Middle East. I owe my deep and unending appreciation for salsa to growing up in Arizona around an endless array of salsa options. The above recipe for salsa is a pretty basic one, but if you want to really dig in, I recommend checking out La Santisma Taco Shop in Phoenix, which sports a vast array of salsa options the likes of which I had never experienced before. While Mexican and Latinx food is obviously an absurdly huge spectrum, I love celebrating Silvana Salcido Esparza (of Barrio Cafe fame) as someone to look towards.
Preserved lemons are a great example of a food you’ll use all the time if it’s around the kitchen, but would almost never find a reason to buy. It’s just a fancier, punchier lemon, but it tastes much more complex than its shockingly simple ingredient list would lead you to expect.
By simply fermenting Meyer lemons with salt, you turn sour, mouth puckering lemons into funky, deliciously mellow, umami-rich vehicles of acid. Add slivers to your salads, pitch a whole one into the blender when making hummus, punch up a salsa or slaw, and add to shakshuka or tagine.
To make them, you should purchase Meyer lemons—not conventional lemons with thicker skin—and canning salt. The lemons should be clean and devoid of any marks or soft spots. Slice them into quarters and dip every side into salt.
Pack those salted segments into a jar, tightly enough that lemon juice starts to come up the sides. When you’re done, you should have enough lemon juice to cover all the lemons, and if you don’t, add some to top it off. They should be packed in tight enough that you don’t need a weight on the top to keep everything submerged.
It takes a month or so for preserved lemons to…preserve. To test them, just open the top, pluck one out with a fork, and take a bite.
Preserved lemons have an interesting origin—Mary Ellen Snodgrass attributes them to late 11th century Arab Mediterranean culture, but they’re common in Indian and North African cuisine, as well, and delicious in every single application you can dream up for them.
Capers are the tiniest workhouse in the pickle world, and in the dregs of winter, a savior. That rice dish? Add capers. A tomato sauce that needs a kick? Capers. A cheese plate that needs a punch? A fish that could use some flavor? Any bagel with cream cheese?
Capers, capers, capers.
And while you’re unlikely to make capers yourself (they reluctantly grow only in very dry areas on low-lying caper berry plants at a rate that rivals evolution), they are easy enough to pick up at the store in the pickle section. They are, in fact, just small undeveloped flower buds from the caper bush. (Many people, like me, make imposter capers with nasturtium seeds and buds.)
If you’re new to capers, I recommend making some basic rice or other grain, and then throw in a tablespoon or two so that you may experience the power of the tiny, preserved flower bud. They add acid and salt and just bring everyone together in a very delightful way.
Capers have always felt Italian to me in origin, but no surprise if you’ve been playing along at home, they’re Asian in origin. Capers are mentioned in Gilgamesh! (Bust that out the next time there’s a lull in party conversation. You’re welcome!)
Freelancers cover news, tech, and entertainment for Lifehacker.
RECOMMENDED NEWS

This Super Bowl Sunday, Consider a Chili Cheese Bar
This Sunday, I will be watching the Super Bowl with my father for the first time in literally foreve...

All the Ways You Can Microwave an Egg
The microwave is a useful little appliance that you can make many fine things with, including lemon ...
How to Bulk Up a Pathetic, Watery Soup
Soup can be a meal, provided it has enough stuff in it, but sometimes the reality inside the can doe...

The One Thing You Should Always Do Before Freezing Chicken Breasts
The combination of chest freezer and vacuum sealer is a powerful one. As someone who needs to eat a ...

Make This Brisket-Based Chili if You Need the Most Meat
Hello cats and kittens, and welcome to another delicious installment of the Skillet Chili Cook-Off, ...

9 Creative Ways to Serve Pigs in a Blanket
The Super Bowl is fast approaching, and I’ve got one thing on my mind: small hot dogs. Not isolated,...
Comments on "7 Perfect Pickles You Must Keep on Hand at All Times" :